昨日の続き、今回は接続したカメラから画像を取込みます、
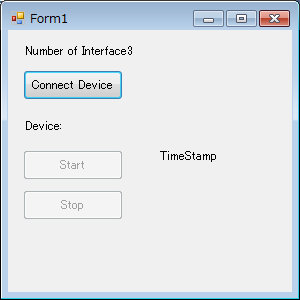
作成したサンプルソフト画面は、こんな感じ。

上から、ConnectDeveice(button1)でカメラを検出、
検出出来ると、Start(button2)が有効に変わります。
Startを押すと画像取込開始、画像のTimeStamp情報を表示します、
Stop(button3)を押すと、取込停止します。
今回は画像表示は無し、PvGUIDotNetには”DisplayControl”という仕組みが有り、
Form上に貼ればお手軽に表示出来るようなのですが、また後日ということで。
Streamの設定
昨日のbutton1のカメラ検出部分に処理を追加しています、
Create and Open streamより後が追加した部分。
Perform GigE Vision only configurationは、GEVカメラ限定の処理、
NegotiatePacketSize()でパケットサイズを最適化してるのでは?
と推測していますが、今回はUSBカメラなので未検証です。
その後PayLoadSizeを取得し、取込バッファ数だけpVBufferを定義
(サイズはPayLoadSize)、それをmStream.QueueBufferでStreamに定義します。
                // Create and Open stream.
                mStream = PvStream.CreateAndOpen(lDeviceInfo);

                // Perform GigE Vision only configuration
                PvDeviceGEV lDGEV = mDevice as PvDeviceGEV;
                if (lDGEV != null)
                {
                    // Negotiate packet size
                    lDGEV.NegotiatePacketSize();

                    // Set stream destination.
                    PvStreamGEV lSGEV = mStream as PvStreamGEV;
                    lDGEV.SetStreamDestination(lSGEV.LocalIPAddress, lSGEV.LocalPort);
                }

                // Read payload size, preallocate buffers of the pipeline.
                Int64 lPayloadSize = mDevice.PayloadSize;

                // Get minimum buffer count, creates and allocates buffer.
                UInt32 lBufferCount = (mStream.QueuedBufferMaximum < cBufferCount) ? mStream.QueuedBufferMaximum : cBufferCount;
                PvBuffer[] lBuffers = new PvBuffer[lBufferCount];
                for (UInt32 i = 0; i < lBufferCount; i++)
                {
                    lBuffers[i] = new PvBuffer();
                    lBuffers[i].Alloc((UInt32)lPayloadSize);
                }
                // Queue all buffers in the stream.
                for (UInt32 i = 0; i < lBufferCount; i++)
                {
                    mStream.QueueBuffer(lBuffers[i]);
                }
            }
            catch (PvException ex)
            {
                MessageBox.Show(ex.Message, Text, MessageBoxButtons.OK, MessageBoxIcon.Error);
            }
            // Enable Start Button
            button2.Enabled = true;
        }
    }
}
取込開始
Start(button2)を押した時の処理です、取込用スレッドを定義して開始、
mDevice.StreamEnable()でStreamを有効にしてから、”AcquisitionStart”を送ります。
private void button2_Click(object sender, EventArgs e)
{
    // Start display thread.
    mThread = new Thread(new ParameterizedThreadStart(ThreadProc));
    Form1 lP1 = this;
    object[] lParameters = new object[] { lP1 };
    mIsStopping = false;
    mThread.Start(lParameters);

    // Enables streaming before sending the AcquisitionStart command.
    mDevice.StreamEnable();

    // Start acquisition on the device
    mDevice.Parameters.ExecuteCommand("AcquisitionStart");

    // Disable Start Button & Enable Stop Button
    button2.Enabled = false;
    button3.Enabled = true;
}
取込スレッドの処理は以下、RetrieveBufferでStreamからデータを取得します、
PvResultは処理結果ですが、IResultとIOperetionResult、2つ見てるようです。
(この辺の詳細は未調査、サンプルソフトそのままです)
両方ともOKで有れば、タイムスタンプを表示させています。
ここでIBufferの中身を参照すれば、生データそのものも扱えそうです。
Stop(button3)を押すとForm1内のmIsStoppingがtrueに設定されることで、
forループを抜けるようになっています。
private static void ThreadProc(object aParameters)
{
    object[] lParameters = (object[])aParameters;
    Form1 lThis = (Form1)lParameters[0];

    for (; ; )
    {
        if (lThis.mIsStopping)
        {
            // Signaled to terminate thread, return.
            return;
        }

        PvBuffer lBuffer = null;
        PvResult lOperationResult = new PvResult(PvResultCode.OK);

        // Retrieve next buffer from acquisition pipeline
        PvResult lResult = lThis.mStream.RetrieveBuffer(ref lBuffer, ref lOperationResult, 100);
        if (lResult.IsOK)
        {
            // Operation result of buffer is OK, display.
            if (lOperationResult.IsOK)
            {
                lThis.label3.Text = lBuffer.Timestamp.ToString();
            }

            // We have an image - do some processing (...) and VERY IMPORTANT,
            // re-queue the buffer in the stream object.
            lThis.mStream.QueueBuffer(lBuffer);
        }
    }
}
取込開始すると、TimeStampの値が変わっていくのが判ります。

取込停止
Stop(button3)を押した時の処理です。
Deviceに"AcquisitionStop"を送ってから、StreamDisable()にします、
mIsStopping = true(→取込スレッドで参照)、mThread.Join()してから、
スレッドをnullにしています、その後Buffer関係の後片付け。
private void button3_Click(object sender, EventArgs e)
{
    try
    {
        PvBuffer lBuffer = null;
        PvResult lOperationResult = new PvResult(PvResultCode.OK);
        PvResult lResult = new PvResult(PvResultCode.OK);

        // Stop acquisition.
        mDevice.Parameters.ExecuteCommand("AcquisitionStop");

        // Disable streaming after sending the AcquisitionStop command.
        mDevice.StreamDisable();

        // Stop display thread.
        mIsStopping = true;
        mThread.Join();
        mThread = null;

        // Abort all buffers in the stream and dequeue
        mStream.AbortQueuedBuffers();
        for (int i = 0; i < mStream.QueuedBufferCount; i++)
        {
            lResult = mStream.RetrieveBuffer(ref lBuffer, ref lOperationResult);
            if (lResult.IsOK)
            {
                lBuffer = null;
            }
        }
    }
    catch (PvException lExc)
    {
        MessageBox.Show(lExc.Message, Text);
    }
    // Enaable Start Button & Disable Stop Button
    button2.Enabled = true;
    button3.Enabled = false;
}
一通りの処理の流れを確認することが出来ました、全体のソースはこちら。
eBUS SDK Sample